Introduction
The holiday season is nearly upon us and it’s time to get into the christmas spirit.
And what better way to do exactly that than to combine a christmas tree with cyber security?
For the last couple of years I’ve been running a honeypot in order to see what attackers and bots are trying to exploit, which countries are most active etc.
And I had this idea that I could combine the honeypot with a christmas tree, so that I could see, in real-time, the christmas lights light up whenever an attack happened. I never got around to making it though - until now.
For the honeypot part I decided to use T-pot (https://github.com/telekom-security/tpotce) since it’s really easy to setup and supports a bunch of different honeypots out-of-the-box.
With some small modifications I configured the different honeypots to send events to a Raspberry Pi that controls the LED strip.
A picture of the christmas tree lighting up can be seen below.

Hardware
Shopping list
- 74AHCT125
- Female DC Power Adapter - 2.1mm
- RGB LED Strip (WS2812)
- Power Supply (5V, 3A)
Setup
In order to wire this up and power everything I decided to use a level shifting chip and a separate power supply for the LED strip. And I based everything on the wiring diagram from Adafruit shown below.
![]()
Since the Raspberry Pi is using 3.3V for the GPIO pins and the LED strip is using 5V, we use the 74AHCT125 chip to convert the signal from 3.3V to 5V.
Also, since each pixel on the LED strip draws up to 60 milliamps at maximum brightness, the Raspberry Pi isn’t powerful enough to power the LED strip when using a lot of pixels.
I’m not using maximum brightness for this project, so I figured I should be good using a 3A power supply for the LED strip.
I should also mention that it is recommended to add a 300-500 Ohm resistor between the Raspberry Pi’s data pin and the data input on the first LED strip. Even though I didn’t do this, it can help prevent voltage spikes that might damage the first pixel on the LED strip.
You can read more about this here.
Software
This very simple flow chart shows how everything is connected and how events flows from the honeypot to the Raspberry Pi.
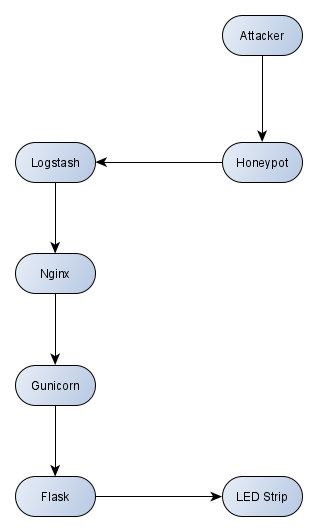
By default, whenever an event occurs on the honeypot, Logstash ships the events to Elasticsearch, which in turn indexes the event and make it searchable in Kibana.
By modifying the config, we configure Logstash to make a POST request to Nginx whenever an event occurs, which in turn proxy passes the event to Flask (with the help of Gunicorn).
Nginx has a default route defined that lights up a random pixel, based on what protocol was attacked.
Logstash
In order to reconfigure Logstash to send events to a different destination, we can do the following:
Get logstash.conf from docker container
docker exec -it logstash ash
cd /etc/logstash/conf.d/
cp logstash.conf /data/elk/logstash.conf
exit
Stop the T-Pot service
systemctl stop tpotReconfigure logstash.conf
Add the code below after the elasticsearch output.
  if [type] == "Cowrie" and [eventid] == "cowrie.login.failed" {
    http {
      url => "http://IP-OF-RASPBERRY-PI"
      http_method => "post"
      format => "form"
      mapping => ["protocol", "ssh"]
    }
  }
  if [type] == "Cowrie" and ([eventid] == "cowrie.login.success" or [eventid] == "cowrie.command.input") {
    http {
      url => "http://IP-OF-RASPBERRY-PI"
      http_method => "post"
      format => "form"
      mapping => ["protocol", "ssh-success"]
    }
  }
  if [type] == "Dionaea" {
    http {
      url => "http://IP-OF-RASPBERRY-PI"
      http_method => "post"
      format => "form"
      mapping => ["protocol", "%{[connection][protocol]}"]
    }
  }
  if [type] == "Rdpy" {
    http {
      url => "http://IP-OF-RASPBERRY-PI"
      http_method => "post"
      format => "form"
      mapping => ["protocol", "rdp"]
    }
  }
  if [type] == "ElasticPot" {
    http {
      url => "http://IP-OF-RASPBERRY-PI"
      http_method => "post"
      format => "form"
      mapping => ["protocol", "elasticsearch"]
    }
  }
  if [type] == "Mailoney" {
    http {
      url => "http://IP-OF-RASPBERRY-PI"
      http_method => "post"
      format => "form"
      mapping => ["protocol", "smtp"]
    }
  }
  if [type] == "Ciscoasa" {
    http {
      url => "http://IP-OF-RASPBERRY-PI"
      http_method => "post"
      format => "form"
      mapping => ["protocol", "ciscoasa"]
    }
  }
  if [type] == "Adbhoney" {
    http {
      url => "http://IP-OF-RASPBERRY-PI"
      http_method => "post"
      format => "form"
      mapping => ["protocol", "adb"]
    }
  }
  if [type] == "Medpot" {
    http {
      url => "http://IP-OF-RASPBERRY-PI"
      http_method => "post"
      format => "form"
      mapping => ["protocol", "ics"]
    }
  }
  if [type] == "Honeytrap" and [dest_port] == 8333 {
    http {
      url => "http://IP-OF-RASPBERRY-PI"
      http_method => "post"
      format => "form"
      mapping => ["protocol", "bitcoin"]
    }
  }
Reconfigure tpot.yml
Add a new docker volume for the Logstash service.
- /data/elk/logstash.conf:/etc/logstash/conf.d/logstash.confRestart the T-pot service
systemctl start tpotSource: https://github.com/telekom-security/tpotce/wiki/Reconfigure-logstash.conf
Nginx
After installing Nginx on the Raspberry Pi we need to reconfigure it in order to handle requests coming from the honeypot.
Add the following site configuration under /etc/nginx/sites-enabled/
server {
        listen 80;
        location / {
        include proxy_params;
        proxy_pass http://unix:/tmp/honeytree.sock;
    }
}
Every request coming in on port 80 will now be proxied to /tmp/honeytree.sock - which gunicorn will create.
Gunicorn
After installing gunicorn we can create a Systemd service. You will need to change the WorkingDirectory to the directory where you store the source code for the Flask application.
Place the file in /etc/systemd/system/
[Unit]
Description=HoneyTree - Gunicorn daemon for honeytree.py
After=network.target

[Service]
User=root
Group=root
RuntimeDirectory=gunicorn
WorkingDirectory=PATH-TO-PROJECT-FOLDER
ExecStart=/usr/local/bin/gunicorn --bind=unix:/tmp/honeytree.sock --workers=1 honeytree:app
ExecReload=/bin/kill -s HUP $MAINPID
ExecStop=/bin/kill -s TERM $MAINPID

[Install]
WantedBy=multi-user.target
We can make sure the gunicorn daemon automatically starts at boot by doing the following:
systemctl enable <name-of-service>Flask
The main source code is shown below.
import time
from random import sample
from flask import Flask
from flask import request
from rpi_ws281x import PixelStrip, Color, ws
from utils.utils import color_wipe_rain
from ConfigParser import SafeConfigParser

app = Flask(__name__)

config = SafeConfigParser()
config.read('settings.conf')

# Create NeoPixel object with appropriate configuration.
strip = PixelStrip(
config.getint('ledstrip', 'LED_COUNT'),
config.getint('ledstrip', 'LED_PIN'),
config.getint('ledstrip', 'LED_FREQ_HZ'),
config.getint('ledstrip', 'LED_DMA'),
config.getboolean('ledstrip', 'LED_INVERT'),
config.getint('ledstrip', 'LED_BRIGHTNESS'),
config.getint('ledstrip', 'LED_CHANNEL'),
ws.WS2811_STRIP_RGB)

# Intialize the library (must be called once before other functions).
strip.begin()

# List of colors used by the pixels (GRB)
predefined_colors = {
'ssh': Color(0,0,255), # BLUE
'ssh-success': Color(0,255,0), # RED
'rdp': Color(20,255,147), # PINK
'smbd': Color(255,0,0), # GREEN
'bitcoin': Color(210,210,27), # YELLOW/GOLD
'adb': Color(242,64,224), # LIGHT BLUE
'elasticsearch': Color(255,0,162), # GREEN/BLUE
'tcp-forward': Color(255,255,255) # WHITE (attempt to proxy traffic)
}

# Initial random list of pixels
available_pixels = sample([x for x in range(0, strip.numPixels())], strip.numPixels())

@app.route('/', methods=['POST'])
def honey_tree():
    global available_pixels

    try:
        proto = request.form['protocol']  # Get message from Logstash
        if proto is not None:
            if proto in predefined_colors.keys():  # If proto key exist in dict
                # Remove whitespace front and back
                proto = proto.strip()
                # Get a random pixel
                if len(available_pixels) < 1:  # No available pixels left
                    # Wait before wiping all pixels
                    time.sleep(0.5)
                    # Wipe all pixels
                    color_wipe_rain(strip)
                    # Generate random pixels and shuffle again
                    available_pixels = sample([x for x in range(0, strip.numPixels())], strip.numPixels())
                # Pop new index from list
                _index = available_pixels.pop()
                # Set new color based on preset
                strip.setPixelColor(_index, predefined_colors[proto])
                strip.show()
    except Exception:  # If something happens, ignore it
        pass
    return 'OK'  # Return something so Flask don't complain

if __name__ == '__main__':
    app.run()
In the code above we create a dictionary called predefined_colors. This dictionary contains every protocol and color combination we want to support.
For example, if someone successfully authenticates against the SSH honeypot, {'procotol':'ssh-success'} will be received from Logstash, and a random pixel on the LED strip will light up with the color red.
Or, if someone tries to RDP to the honeypot, {'protocol':'rdp'} will be received from Logstash, and a random pixel will light up with the color pink
The full project can be pulled from Github by going to the following repo: https://github.com/s1gh/HoneyTree
Demo
When everything is implemented we end up with a christmas tree that lights up whenever an attack is happening against one of the predefined protocols.
The delay from an attack occurs to an actual LED lights up, seems to be about 0.5 - 1 second, which is pretty good, if you ask me.